
How to Strip and Wax · Warren, OH
How Floor Stripping and Waxing Is Done, Step by Step
The full process a commercial crew uses to take a VCT floor down to bare tile and build a new shine, plus the safety steps most DIY guides skip.
Request a Free Walk-ThroughCall (330) 219-7916
Every building starts with a free walk-through and a written checklist and price.
Prefer to talk it through? Call (330) 219-7916, Monday to Friday, 9 to 5.
- Scope built around youA written checklist for your building, not a generic list.
- Planned service windowsNights, weekends or days, around your hours.
- Same crew every visitPeople who learn your building and its priorities.
- Local Valley routesRun from our Warren office since 2012.
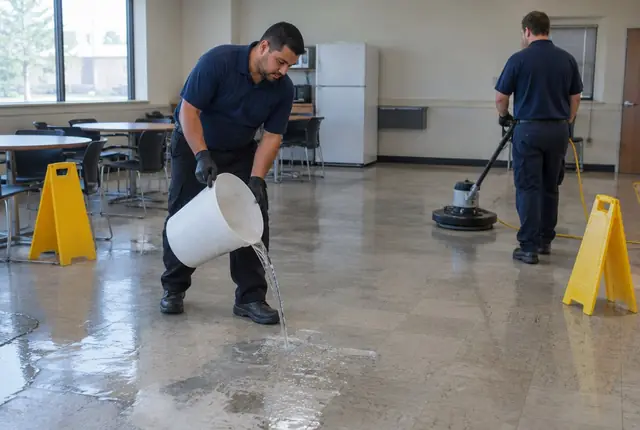
To strip and wax a floor, you clear the room, dust mop, apply diluted stripper in small sections, let it dwell, scrub the old finish off with a floor machine and black pad, vacuum up the slurry, rinse until the floor is clean, then lay three or four thin coats of finish with drying time between each. On a VCT floor in a commercial building, that is a night or weekend job for a small crew.
We strip and refinish floors in offices, churches, daycares and shops across Trumbull and Mahoning County, and this is the same order of work our crews follow. If you are still deciding whether your floor needs a full strip at all, start with our guide to strip and wax vs buff vs burnish. If you would rather hand the job off, see our floor stripping and waxing service.
What Does It Take to Strip and Wax a Floor?
It takes a floor machine, a wet/dry vacuum, stripper, a neutralizer or clean rinse water, floor finish, the right pads and mops, and protective gear. It also takes time: a closed area for most of a shift, plus hours of dry time before anyone walks on it. Hillyard's stripping guide recommends a crew of three or four workers.
One quick note on words. "Wax" is shop talk. Commercial resilient floors get a water-based acrylic or polymer floor finish, not paste wax. The process below is for vinyl composition tile (VCT) and similar resilient floors. Luxury vinyl plank, glazed porcelain and natural stone usually should not be stripped and waxed, so check the floor's care guide first.
What Tools and Supplies Do You Need?
You need equipment to remove the old finish, equipment to pick up the mess, and clean tools to lay new finish. Using the same mop for stripping and finishing is the fastest way to ruin the new coats. Keep a dedicated, clean finish mop and bucket that never touch stripper.
- Floor machine (swing machine) with black stripping pads; Armstrong says to scrub its VCT at 300 RPM or less
- Wet/dry vacuum for slurry pickup, with defoamer in the recovery tank
- Floor stripper, diluted per the label, and a neutralizer or clean rinse water
- Two mop buckets with wringers: one for stripper, one for rinse
- A separate clean bucket lined with a trash can liner, plus a microfiber flat mop or rayon finish mop
- Floor finish (check the label for coats, dry time and minimum temperature)
- Edge tool or hand pad for corners and baseboards
- Goggles or face shield, chemical-resistant gloves and stripping boots
- Wet floor signs and tape or cones to close the area
- Fans pointed away from the floor and a plan for fresh air
Step 1: Clear the Room, Dust Mop and Protect the Edges
Move every piece of furniture, mat and trash can out of the room. Sweep the baseboard line, then dust mop the whole floor so you are not grinding grit into the tile. Hillyard also suggests wiping a thin protective coat on baseboards so slurry wipes off later instead of staining them.
Close the area with signs and cones before any liquid hits the floor. Open windows or run the air handler on fresh air if you can. Hillyard's guide puts it plainly: "Vapors from this process can be harmful."
Before we mix anything, we walk the room and mark the trouble spots: yellowed corners, heavy buildup in doorways and spots under desks where nobody has scrubbed in years. Those areas get extra stripper and a second pass, so we plan for them up front instead of finding them after the first coat of finish shows every miss.
Step 2: Mix the Stripper and Work in Small Sections
Dilute the stripper exactly as the label says. Imperial Dade warns that a mix that is too strong can damage floors or bleach tile, and one that is too weak won't remove the old finish. It also recommends mixing with cool water, since hot water increases chemical odors and evaporates faster.
Mop the stripper on generously in one section at a time. Imperial Dade suggests sections of about 10 feet by 10 feet, and only as much as you can remove within 20 to 25 minutes. Hillyard gives a coverage rate of 250 to 300 square feet per diluted gallon and a dwell time of three to ten minutes, longer for more layers of finish. The one rule that matters most: never let the stripper dry on the floor. If it starts to dry, put more down.
Step 3: Scrub, Pick Up the Slurry and Rinse Twice
Scrub the section with the floor machine and a black stripping pad. Hillyard's method is to start near the wall and work outward, moving at about two feet per second and overlapping each pass by 50 percent. Use an edge tool or hand pad along baseboards and in corners the machine can't reach. If the pad clogs with slurry, flip it or swap it.
Pick up the slurry with the wet/dry vacuum right behind the scrubbing, before it dries. Any spot that still looks glossy gets more stripper and another pass.
Then rinse. Hillyard calls for a neutralizer at 250 to 300 square feet per gallon, picked up with the wet/dry vacuum, followed by a clean water rinse. 3M's finish directions say to rinse with water until no residue remains and let the floor dry thoroughly. So, yes, you mop after stripping, and usually more than once.
The rinse is where most strip jobs go wrong. Stripper left on the tile keeps working under the new finish, and a few weeks later the coats turn cloudy or peel. Our crews do not lay finish until a dry white towel wiped across the floor comes up clean. It costs a few extra minutes and saves a redo.
Step 4: How Many Coats of Finish Should You Apply?
Most VCT floors get three to four thin coats after a strip, with full drying time between each. Armstrong's VCT guide calls for at least 3 coats after stripping. 3M's Scotchgard Low Maintenance 25 directions call for 3 to 4 medium coats, 20 to 30 minutes apart, and no more than 4 coats within 24 hours.
Pour finish into a lined, clean bucket, dip a clean flat mop, and lay it in thin, even strokes. Cut in along the edges first, staying a few inches off the baseboard, then fill the field. CMM Online's VCT article offers a rule of thumb: divide 100 by the finish's solids percentage to get the minimum number of coats, so a 25% solids finish needs at least four.
| Finish step | What the source says | Source |
|---|---|---|
| Coats after stripping | At least 3 coats | Armstrong Flooring |
| Coats in one day | 3 to 4 medium coats, no more than 4 within 24 hours | 3M |
| Time between coats | 20 to 30 minutes, depending on conditions | 3M |
| Minimum room temperature | 50 F | 3M |
| Coverage | About 2,000 to 3,000 sq ft per gallon | 3M |
| Foot traffic | Keep traffic off for at least 8 hours | Imperial Dade |
| First buff or burnish | Wait 24 to 48 hours (Imperial Dade); 48 to 72 hours for this finish (3M) | Imperial Dade, 3M |
| Full hardness | 5 to 7 days | 3M |
The label on your bottle wins over any general guide.
How Long Before People Can Walk on a Freshly Waxed Floor?
Plan on keeping foot traffic off the floor for at least 8 hours after the last coat, per Imperial Dade, and hold off on buffing or burnishing for 24 to 48 hours. 3M says its Scotchgard 25 finish reaches full hardness in 5 to 7 days, so go easy on the floor that first week.
If you use fans to speed drying, Imperial Dade says to point them at the ceiling, not the floor, so dust doesn't blow into wet finish. That timing is why most commercial strips happen on a Friday night or over a holiday weekend. During winter, salt and slush tracked onto a soft new finish can etch it fast, which we cover in our winter salt guide for commercial floors.
How Do You Stay Safe When Stripping a Floor?
Treat stripper as a chemical hazard and the wet floor as a fall hazard. Ventilate the room, wear goggles, gloves and stripping boots, read the safety data sheet, never mix stripper with other chemicals, and keep everyone out until the floor is dry.
Stripper chemistry. Floor strippers are alkaline. The safety data sheet for one commercial floor stripper sold by Indiana Correctional Industries (revised February 16, 2021) lists a pH of 10.8, and 10.4 at a 1:4 dilution. It contains ethanolamine, warns that it causes serious eye irritation, skin irritation and possible respiratory irritation, and lists acids and strong oxidizers as incompatible. Many strippers also contain the solvent 2-butoxyethanol. The NIOSH Pocket Guide sets a recommended exposure limit of 5 ppm for it, against OSHA's 50 ppm limit, and notes that it absorbs through the skin.
Ventilation. The same SDS says to use the product only in well-ventilated areas and to avoid breathing mist or vapor. In a closed room, open what you can and run fresh air.
Slip hazards. A floor covered in stripper slurry is about as slick as a floor gets. OSHA lists slips, trips and falls among the leading causes of serious work-related injuries and deaths. Wear boots made for stripping, rope off the area, and never walk on a section you just scrubbed until it is vacuumed and rinsed.
- Read the stripper's safety data sheet before mixing
- Goggles or face shield, chemical-resistant gloves and stripping boots on every worker
- Mix with water only, never with bleach, acids or other cleaners
- Ventilate the space and keep occupants out of the area
- Wet floor signs at every entrance, and the area closed until the final coat is dry
- Unplug cords from wet areas and keep them behind the machine
Can You Strip and Wax a Floor Yourself?
Yes, a small room can be done by one careful person with a rented floor machine, or even by hand with a pad on a pole for a tiny space. Large floors, busy buildings and floors with years of buildup are a different job. The table shows where DIY usually works and where a crew is the safer bet.
| DIY | Professional crew | |
|---|---|---|
| Best fit | A small room, laundry room or single hallway | Offices, churches, daycares, shops and long corridors |
| Equipment | Rented floor machine or hand pad; wet/dry vacuum | Floor machines, edge tools, wet/dry vacuums, auto scrubbers |
| Heavy buildup | Often needs repeat passes and leaves missed spots | Planned double strip on problem areas |
| Rinse and finish | Easy to under-rinse or lay coats too heavy | Rinse checked before finish; coats laid thin and timed |
| Downtime | Your weekend | Scheduled at night or on weekends while the building is closed |
| Risk | Chemical splashes, slips, a cloudy or peeling finish | Trained crew with PPE, signs and the right products |
The DIY jobs we get called to fix usually have the same problem: too much finish put down too fast. Thick coats stay soft, show every footprint and trap dirt, which matches 3M's warning that heavy coats or short drying time cause stickiness and dirt retention. If you do it yourself, go thinner than feels right and wait longer than feels necessary.
What Are the Most Common Strip and Wax Mistakes?
The most common mistakes are letting stripper dry on the floor, mixing it too strong, skipping or rushing the rinse, using a dirty mop for finish, laying coats too thick, and letting people walk on the floor too soon. Each one shows up later as haze, peeling, footprints or a floor that needs stripping again early.
Armstrong warns against brown or black pads and stiff, highly abrasive brushes for routine work on its resilient flooring, so save the black pad for stripping only. Armstrong also says to wait at least five days after new tile is installed before any wet washing, machine scrubbing or stripping. Good interim care stretches the time to the next strip. Our guide on how often to strip and wax VCT covers the schedule.
How Phillips Care Strips and Waxes Floors
We start with a free walk-through. We check the floor type, how much finish is on it, where it's yellowed or worn through, and whether a full strip is really needed or a scrub and recoat will do. You get a written plan and quote, and we schedule the work days, nights or weekends so your building is closed while the floor dries.
Phillips Care Cleaning was founded in 2012 in Warren by Fernando Phillips, who spent 15+ years in property care before that. We're insured and bonded, the same crew comes back for follow-up burnishing, and floor work can be quoted per visit or built into a flat monthly plan with your commercial floor care. For routine shine between strips, see our floor buffing and polishing service.
Call (330) 219-7916 or request a walk-through below.
Sources
- Hillyard, Best Practice Guide: How to Strip Floor Finish, retrieved 2026-10-16
- Imperial Dade, 6 Expert Tips to Strip and Wax Commercial Hard Floors (Apr 16, 2021, updated Apr 3, 2026), retrieved 2026-10-16
- Imperial Dade, Strip and Wax vs Scrub and Recoat (Apr 2021, updated Apr 3, 2026), retrieved 2026-10-16
- 3M, Scotchgard Low Maintenance 25 Floor Finish Technical Data (Aug 2011), retrieved 2026-10-16
- Armstrong Flooring (AHF), Maintenance Recommendations for VCT with Diamond 10 Technology Coating (updated Apr 16, 2026), retrieved 2026-10-16
- CMM Online, Rethinking VCT Floor Maintenance (Richard Bodo, Jun 9, 2021), retrieved 2026-10-16
- Indiana Correctional Industries, Floor Stripper CNG-1060 Safety Data Sheet (revised February 16, 2021), retrieved 2026-10-16
- CDC / NIOSH, NIOSH Pocket Guide to Chemical Hazards: 2-Butoxyethanol, retrieved 2026-10-16
- OSHA, Walking-Working Surfaces, retrieved 2026-10-16
Frequently asked questions
How to Strip and Wax questions, answered.
A free walk-through is the best way to plan your cleaning. These are the questions we hear most from Valley facility managers and owners.
How long does it take to strip and wax a floor?
The work itself often takes several hours for a commercial room, plus drying. Imperial Dade puts a typical strip and finish at about 4 to 5 hours of work, depending on size and crew. Each coat of finish then needs about 20 to 30 minutes to dry, per 3M, and Imperial Dade says to keep foot traffic off for at least 8 hours after the last coat. That is why most strips are done overnight or on weekends.
Do you mop after stripping a floor?
Yes. After the slurry is picked up, the floor gets rinsed, often with a neutralizer first and then clean water. 3M's finish directions say to rinse with water until no residue remains and let the floor dry thoroughly before applying finish. Stripper left on the tile keeps working under the new coats and can make them cloudy or peel, so the rinse is not a step to rush.
How many coats of wax should a floor get?
Most VCT floors get three to four thin coats after a strip. Armstrong calls for at least 3 coats, and 3M's Scotchgard 25 directions call for 3 to 4 medium coats with no more than 4 within 24 hours. CMM Online suggests dividing 100 by the finish's solids percentage, so a 25% solids finish needs at least four coats. Thin coats dry harder and last longer than heavy ones.
How do you strip and wax a floor without a machine?
For a very small room, you can apply stripper with a mop, let it dwell, scrub by hand with a stripping pad on a pole or a hand pad, then pick up the slurry with a wet/dry vacuum or mop and rinse well. It is slow, hard work, and it rarely gets heavy buildup off evenly. For anything bigger than a small room, a floor machine does the job faster and more evenly.
Is floor stripper dangerous?
It can be. Floor strippers are alkaline; one commercial stripper's safety data sheet lists a pH of 10.8 and warns of eye, skin and respiratory irritation. Many contain 2-butoxyethanol, which NIOSH says can absorb through the skin. Use it only with good ventilation, wear goggles, gloves and stripping boots, mix it only with water, and follow the label and safety data sheet for the product you use.
When can you buff a newly waxed floor?
Wait at least a day. Imperial Dade says not to buff or burnish for a minimum of 24 to 48 hours after the last coat, and 3M says to let its Scotchgard 25 finish cure 48 to 72 hours before burnishing. Burnishing soft finish too early can scuff or haze it. After that first cure, a regular buff or burnish schedule keeps the shine and pushes back the next strip.
Related services
More from the same crew
Floor Stripping & Waxing
Old, yellowed finish stripped to bare tile and fresh coats laid down, so dull floors look new again.
Explore serviceCommercial Floor Care
Scrubbing, stripping, waxing and burnishing on a schedule that keeps VCT, vinyl and tile floors shining.
Explore serviceFloor Buffing & Polishing
Machine scrubbing, buffing and high speed burnishing that bring back the shine between strip and wax jobs.
Explore serviceRequest a free quote
One walk-through, one written price, one number to call: (330) 219-7916.
Start the conversation